Journal of Light Construction
Since 1982, JLC has provided guidance to residential and light commercial contractors about what works, what doesn't, and why.
Recent Posts

Our hearts are heavy today, having learned that Jed Dixon passed away this morning. Surely Jed will be remembered for his kindness and generosity, as well as his carpentry prowess. A longtime friend of JLC whose contributions on stairbuilding underpin that topic in our archive, we met Jed through Mark Luzio and Karel Bauer when he joined the JLC Live crew and taught the stairbuilding clinic at the very first "Buildable House" live demonstration in 1995 (when the show was called the Construction Business and Technology Conference), and he continued in this role until just a few years ago when his friend and mentee, Mike Kennedy, took over at JLCLive. For those who never had the privilege of learning from him, we encourage you to head online to ThisIsCarpentry.com, where his dear friend @garymkatz1 has captured the very best of Jed's teaching. Or search "Jed Dixon JLConline" RIP Jed. #trainingthetrades #jlconline #jlclive
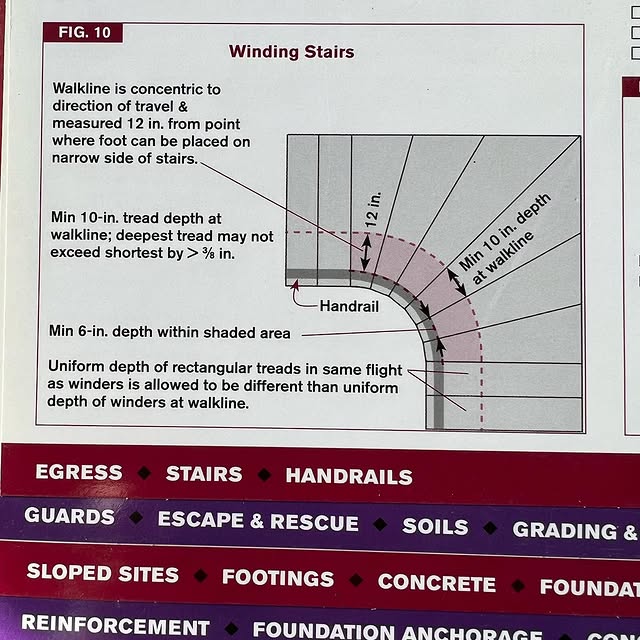
Last week I read through the entire IRC Code section on stairs. It’s not actually very long or complicated. I also looked at the visual guides I own on meeting stair codes and found graphics for two winder designs I posted about yesterday. The first is the curved inside stringer version and is shown in the “Code Check” by the folks @finehomebuilding and @tauntonbooks and the second is from the Field Guide to Frame Construction by @jlconline and shows the winders going around a square inside 1/4 turn. These are both shown as good illustrations of code compliant stairs. It’s also worth noting that the last drawing I show, of dancing winders and the model both meet the same code requirements as the first two cases. The model would also need a continuous handrail to meet code as primary egress stairs. My point is that all of these designs can be built to meet or exceed code requirements and can save space and be comfortable and safe. Having these documents that illustrate these codes can help if you need to convince skeptics. Note: the JLC graphic shows a 9” minimum tread depth on the walkline, which I believe is the Massachusetts code and maybe Rhode Island? Most of us have a 10” minimum. #stairdesign #staircode #codeeducation #stairbuilder #winderstairs #dancingwinder #spacesavingstairs #finishcarpentry #trimcarpentry

@iron_arc_fab To clarify the cover in the post by @bigdogconstruction.gm, the additional photos show a bit of what's covered in the structural repair article by @jakemlewandowski. Jake runs Great Lakes Builders based in the Chicago area, and on this project – an extensive structural repair of an A-frame type extension on a large custom home – he relied on Jorge Garcia (the guy on the cover) for field welding services – in this case to tie angled steel columns to helical piers at the base and existing flitch plates at the top. As Jake explains: “The original structure appeared to be built with clad, heavy timber rafters that continued past the roof overhang and tied into a clad, horizontal timber beam, which completed a triangle. After we removed the cladding from the rafters, though, we discovered they were constructed from two roughly 3-by-14-inch boards sandwiching a 1/2-inch steel flitch plate welded to a flitch plate in the horizontal member. The floor system sat above this horizontal beam. This design may have worked while the wood framing was sound, but once the wood rotted out, the integrity of the bolted assembly was severely compromised. Rather than try to reproduce this triangular load path, we worked with our engineer on a repair that redefined the load path: By driving helical piers at the same angle as the slope of the roof, the thrust of the rafters would be supported in-line with the rafters. We also supported the floor system with laminated veneer lumber (LVL) beams and completely reframed the supporting walls to create a robust structure with redundant support paths.” #structuralrepairs #framing #structuralsteel #trainingthetrades #skilledtrades #JLConline

During Design and Construction Week 2024, JLC Contributing Editor Nicole Tysvaer @symbihomes interviewed more than a dozen homebuilding professionals about various products supporting sustainability in the built environment. This video offers some highlights. Thanks to @geappliances @mitsubishihvac @aprilaireco @tantimberofficial @aerobarrier @retrotec @malarkeyroofingproducts @certainteed @insinkerator for their contributions. #IBS2024 #KBIS2024 #Designandconstructionweek #sustainablebuilding #sustainablehomes #buildingdecarbonization
Posted at the top of the home page for JLConline.com this week is "Avoiding Paint Callbacks" by Nigel Costolloe, owner of Catchlight Painting, a full-service custom painting company serving the Boston area. For wood siding (and to a certain extent, fiber-cement and engineered wood), success with exterior coatings starts with the carpenters. Nigel writes: These days, most of my company's painting projects are likely to involve some carpentry. I now have a few well-rounded carpenters on my own payroll, and they sometimes spend days replacing siding and trim or even remodeling a porch, before my prep crew starts to work. So the information here isn't just kibitzing - it's what our own crew does in the field. photo 2: Without back-priming, daily and seasonal moisture cycling will soon cause beveled wood siding to cup and warp, as well as crack. photo 3: Unprimed siding won’t hold paint for long. This paint job applied to unprimed new wood on a new addition is less than five years old. photo 4: Carpenters have installed factory-primed window casing material without sealing the ends. Also, the stain was applied without any sanding or repriming. Factory primer will not provide the "tooth" that helps finish coats bind strongly to the material. To prep, touch-sand or power-wash the wall (or both), spot-prime areas of bleed-through with an oil-based stain-blocking primer, then prime the entire wall with regular acrylic primer before applying a finish coat of paint or stain. photo 5: When carpenters overdrive gun nails beneath the surface of a board, water finds a place to collect and penetrate exposed wood fiber ends. Here, the coating has started to peel next to this nail hole, even on the shady north side of a house. photo 6: As wood expands and contracts with changes in moisture and temperature, smooth-shank nails may gradually work proud of the board surface. We always replace them with ring-shank nails (either hot-dipped galvanized or stainless steel). #housepainting #carpentry #skilledtrades #trainingthetrades

This story was posted to JLConline.com yesterday, and possibly my favorite assignment ever. "... there is no silver bullet, no guaranteed training solution that is going to lead construction employers out of [the skilled labor shortage]. However, there are some glimmers of hope. The story of Rancho Cielo’s stunning win at the Orange County Sustainability Decathlon in Costa Mesa, Calif., is one of those glimmers for all of us in the building trades, not least because this story brings us all one step closer to a model for practical, healthy, net-zero, and water-efficient homes." "...the Orange County Sustainability Decathlon announced that the team representing Rancho Cielo Construction Academy won the top prize in a sustainable home design and construction competition. Rancho Cielo was not only the smallest school with the fewest resources participating in the challenge, but it was also the only school that doesn’t grant degrees. Rancho Cielo bills itself as a comprehensive job-training program for students who are “underserved” ... All the other teams were from colleges and universities ... " "The Ranch Cielo model home, dubbed “Nexus 01,” won first place in five contests—sustainability and resilience, architecture and design, energy efficiency, health and comfort, and lighting and appliances—and second place in communications and marketing, engineering and construction, and innovation." The communications and marketing contest stood out for Bill Hayward, owner of Monterey-based Hayward Lumber and founder of Hayward Healthy Homes (H3), as a particular point of pride ... not least because other teams he witnessed had student representatives who could speak well about the one or two aspects they had worked on, but did not have a grasp of all the details. “Understanding the house as a complete system is an essential knowledge we coached each student on throughout the design and construction. It’s an essential knowledge for every designer and builder.” #trainingthetrades #skilledtrades @haywardlumber @ranchocieloyouth #orangecountysustainabilitydecathlon

We are grateful to Ian Schwandt @ijswoodworking production manager @tdscustomconstruction for sharing his experience with a new foundation waterproofing system. He is building homes located on clay-soil sites near wetland areas and built using super-insulated assemblies - R40+ for walls and R70+ for the roofs—to a sub-1.0 ACH50 air-tightness standard. These performance standards and the low heating and cooling loads they require coupled with the below-grade living space put extra emphasis on waterproofing, as the HVAC equipment wouldn’t run frequently enough to help control humidity and aid in the drying out of the foundation. Ian writes: I settled on a belt-and-suspenders approach using a foundation wall coating along with a drainage mat that would separate the coating from the stone used to backfill the foundation wall. I decided to also use the wall coating on the faces of the foundation footing to act as a capillary break at the wall/footing joint to keep moisture from wicking up through the footing into the poured concrete wall. After researching various coatings ... I decided on the Mel-Rol system from @wrmeadowsinc because of its local availability ... its price, and its carpenter-friendly installation methods ... Mel-Rol membrane can be installed vertically or horizontally and either overlapped onto the footing face or connected to the footing with detail strip tape.... After the Mel-Rol membrane is applied to a foundation wall, it is covered with a drainage mat to allow water to drain down to the footings without obstruction ... The Mel-Prime [required primer] specifications call for the concrete foundation to cure for 72 hours and all large voids to be filled prior to the install. From a scheduling perspective, this can be challenging when you are also using the Mel-Rol membrane as a capillary break between the footings and walls, as we were. ... To simplify the Mel-Rol install, we cut the membrane into shorter strips that fit between the rebar uprights installed by the concrete crew. By the time we finished cutting the strips, the Mel-Prime was tack-free and ready for the membrane. #foundations #JLConline #trainingthetrades #skilledtrades
We are super grateful to Dave Holbrook for his recent article “Tuning Up Construction Stairs,” in which he grapples with the usual problem of a set of stairs that were cut during framing, perhaps not precisely, and used throughout the build with temporary treads. As the finish carpenter faced with finishing these out, Dave has developed an effective and efficient process for correcting the rough stringers with a series blocks that he makes by ripping 3/4-inch AdvanTech (or any good-quality plywood, engineered subflooring, or material with a solid core). He rips the material to the exact width of his riser and then chops the rippings to length against a stop on his miter saw at the exact width of his tread *plus 1/4 inch* Working from the bottom of the stringers, that extra 1/4 inch gives him a little purchase for the next block up. To install the blocks, he applies construction adhesive to the face of a block, clamps it, predrills (he uses GRK screws that self-pilot but they can still creep out of alignment. Armed with two drill/drivers – one with a pilot bit and another to drive the screws, he works his way up the stringers, using a “check” block to keep the corrective blocks in register. On the front edge of this check block he has screwed a stop edge that butts the edge of the preceding block below. ... He applies the blocks to the outer stringer first and then fills in the block on the center stringer, using a 1-by and level to check the alignment of the corrective blocks across the stringers. As he notes: “Errors can telegraph all the way up a stair, so I take my time. I then install the center stringer block, using the straightedge for reference on both riser and tread surfaces.” Finally, when he's worked his way carefully up all the stringers step by step, he uses a multitool to shave off wherever the old stringers stand proud of his corrective blocks. #carpentry #stairbuilding #JLConline #trainingthetrades
Gary Striegler reports that, for the price (about $200) the Kreg ACS plunge saw is viable track saw option. It has a 6 1/2-inch-diameter blade and works with the company’s 62-inch guide track. "The blade is on the left side, so it is easier for right-handed users to see the cut." Striegler writes. "I know, the track guides the cut, but I still want to be able to check it and make sure I’m not straying off my cut line or over- or under-cutting." "When it comes to power, smoothness of plunging action, and adjusting the depth of cut, I can’t say it is quite on the same level as the best track saws I’ve used, but its performance is perfectly adequate for the kind of work I do ... Unfortunately, the saw isn’t compatible with tracks from other manufacturers. If you need a track longer than Kreg’s 62-inch-long guide track, you can join tracks together with available connectors. For some long cuts, I like to clamp the track, and Kreg makes a clamp that fits under the track. I’ve used its clamps but have discovered that clamps from other manufacturers fit the Kreg track fine and work better ..." Read the full review on JLConline.com
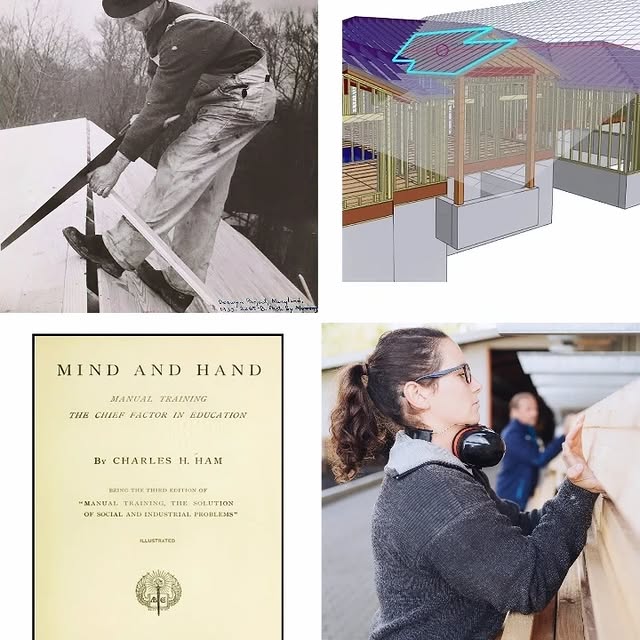
What do these photos have in common? What possibly could they mean? ... Each plays a role in understanding how we got to this seemingly impossible place of a skilled labor shortage ... and each holds a clue to rising out of it, I think. This is Clay. Am excited to present @jlclive conference on Friday 1pm-2:30 for a deep dive into the history and policy that has continually thrown obstacles into the path of construction (as a whole but the chief concern is residential building and remodeling) and a clear-eyed vision of what we need to course correct. If the following excerpt resonates with you, please come! "... college must not be deemed the only path to professionalism, as our public education system still presumes. But we also can’t let the pendulum swing all the way to the opposite conclusion and surrender to a strict avoidance of college as the way to a successful career in the building trades. Indeed, what we fiercely need is to embrace everyone, regardless of background. By “background,” I mean education and experience, but the larger context also pertains. To solve the demographic challenge, background must also encompass gender and ethnicity and family types and any other sort of distinction that separates us. On so many levels, division is not working. For the sake of fostering better building trades and increasing professionalism in the workforce, let’s maintain an open mind and find common ground at every level." #skilledtrades #trainingthetrades #keepcraftalive #workforce #residentialconstruction #housesarenotiphones ... or cars, or paper plates.
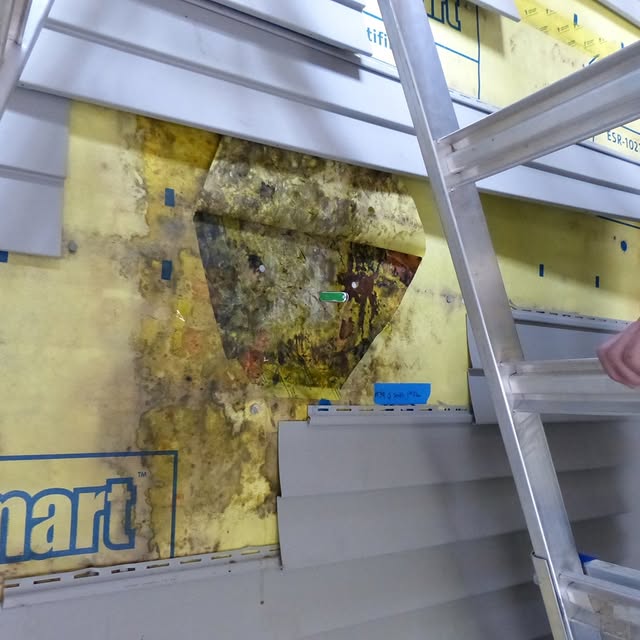
Am very grateful to George Tsongas for his recent JLC contribution: "Installing PVC-Type Sidings in Cold Climates." Some great take-aways from it, including: --"It is important to note that decay occurs only when wood is both wet and warm for extended periods of time ... There is little or no growth below 50°F (10°C)." --"Most damage in walls has been found to be in walls adjacent to bedrooms where relative humidities are typically higher than in other indoor locations. Oftentimes, indoor ventilation, especially in bedrooms, does not keep indoor relative humidities low enough to prevent damage in walls." --"...the moisture load in multifamily walls is much greater than in single-family walls. .. .A [multifamily unit] loses indoor moisture through many fewer walls—often just one or two. So the moisture load in multifamily walls is much greater than in single-family walls. " --"Most people believe that walls clad with contact-applied vinyl siding work well because the siding is applied “loose” and reportedly “drains well.” However, [in the case studies outlined in this article] most of the buildings had some damage to wall components behind the vinyl siding, and ... the damage, which included WRB deterioration, mold, and serious decay of the plywood and OSB sheathings and wall framing, was found to be directly related to water-vapor transport into the wall cavities from indoors. -- OSB decay was surprisingly widespread, but it occurred sporadically. Not all wall areas were affected. It occurred mostly on north-facing walls and seldom on warmer, south-facing walls; often at intersections of interior walls; and in some cases, between floors where air leakage typically was highest. --"... walls with impermeable siding—including conventional vinyl as well as solid, or “cellular,” PVC or polymer-based materials—definitely need to have a fully top- and bottom-vented rainscreen, or sufficiently thick continuous insulation, behind the siding." #watermanagement #waterdamage #condensation #riskmitigation
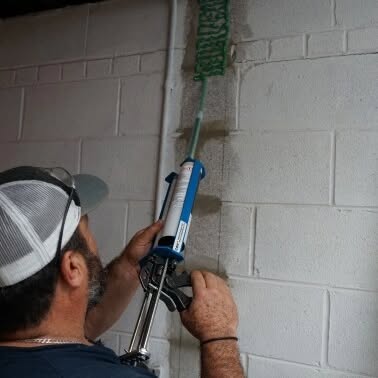
Grateful to @jakemlewandowski for sharing his knowledge in JLC on the use of carbon fiber strapping to repair a block foundation wall. On this job, Great Lakes Builders is using a system from Fortress Stabilization Systems, which has a woven grid of carbon fiber and Kevlar bonded to the wall with a two-part epoxy. They didn’t use the full line of reinforcing products available from the manufacturer. Often, the full product line includes a rim-joist strap connection, commonly called a “necktie,” and a bottom anchor that makes the connection from the bottom of the strap to the existing footing. For this project, the engineer asked Jake to first verify the floor slab thickness, and determined that the slab was thick enough to restrain the bottom of the wall. The crew also pulled insulation out of the joist cavities to verify that the sill plate was well anchored to the foundation wall, checking for anchor diameter and spacing. The engineer deemed the sill-to-foundation connection acceptable except in a few spots where the crew had to add angle brackets to better tie the floor to the sill. The engineer specified strapping “not to exceed 4' 0" on center.” They used a grinder to create a clean bonding surface, and all mortar joints and any horizontal cracks were filled to create a flat surface at each strap location prior to installing the strapping. #foundations #skilledtrades #basementrepair #structuralrepair #trainingthetrades #belowgrade
Similar Influencers

Drewseph Stalin ✌🏼

ㄇㄐㄖ

Shane Donahue

Justin Wood

Daniel Lawless

Uriel Sanchez

Josefa Schundau

Leum Kerzic

BLACK

Alan Overslaugh

YoyoVillage.co.uk

Yo Yo Honey Singhhaa 🤘🏻🔥

Michael Kurti

YOYO Honey Singhhhhhhh.

KARAN ARORA 💫

Casey Ryle

Jonah Andrews

GENTRY | Yoyo World Champion

Phil Wright

E.T. & けん玉

Dušan Brachna

SLUSNY YoYo Obchod

Aisha Francis

Franta Mars

jonathan sitanggang

Sylvie Win & Mom (Parent Held Acct)

Krista Miller

the pointer brothers

BIANCA 🇧🇸